ST185 Change Front Hub
Submitted by - Nibbles
Contents |
Disclaimer
This article is intended as a helpful guide.
If you are in any doubt, or not qualified, do not undertake this maintenance, consult a qualified mechanic
Replacing the hub involves working on the brake system, the steering system and the basic wheel retaining system. Failure to change this in accordance with the relevant manufacturers and/or procedures and/or instructions can lead to severe handling problems. The author or the GT4 Drivers Club cannot be held responsible for any loss or damage resulting from use of this article.
Safety
When working on a car always use the appropriate safety equipment, chock the wheels to prevent the vehicle from moving.
When working underneath a raised vehicle always use axle stands.
What models of GT4 does this guide cover?
This was written for and includes pictures from the ST185. Changing the hub on the ST165 is a similar procedure. Changing the hub on a ST205 follows similar principles but the strut attachment mechanism is different. It uses a broadly similar lower joint but the top of the hub is held to the suspension strut using a ball joint. If you use common sense this giude should still make sense
Tools Required
Tools you will need (additional to decent socket set & spanners, jack & safety)
30mm deep socket for hub nut (1/2 or 3/4 drive)
22mm socket for strut to hub bolts (1/2 or 3/4 drive preferably) plus a second socket or spanner for the other side.
Decent breaker bar for above - the ones nearly a metre long are ideal.
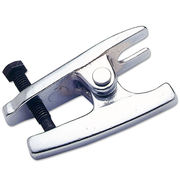
Ball joint splitter or you will need new lower swivel and track rod end in the new hub. Scissor type shown below is ideal.
Procedure
Please read and digest the entire article before starting work. In particular some of the later hints and tips need to be considered during disassembley
| First step is loosening the hub nut as these are normally very tight. :
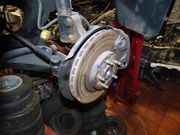
Loosen wheel nuts, jack the car up and remove the wheel. Remove the split pin and castle nut (item A) if the split pin is rusted in, break it off both ends with pliers (repeated bending so it fatigues) then tap it through with a drift once the hub is off. Refit the wheel (temporally) and drop the car back on the ground. Use the 30mm socket and breaker bar to remove the hub nut. If your wheels don't permit a 30mm socket through the middle then use the space saver or any other spare. If all else fails, leave the car in 1st and get an assistant to push very hard on the brake pedal. |
|
| Jack the car back up, and put an axle stand or some other backup underneath (e.g. the wheel) and remove the wheel. It is better to get both front wheels in the air otherwise the anti roll bar applies a lot of force you will need to fight later. No need to remove wheel the other side. | |
| Loosen both the strut - hub bolts (items b) as these can be very tight and are easiest done while the hub is held rigidly. Do not remove yet though. | |
| Remove the whole brake caliper and bracket by undoing 2 bolts (items G) then pull at an angle to push piston back in a fraction then slide off the disc. Leave attached to brake line and hang from the strut with a piece of wire or string. | |
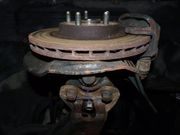
| Remove the brake disc from hub. Soak with WD40 on centre hole and wheel stud holes. It can be pushed off by screwing bolts into the 3 tapped holes (items H) | |
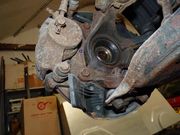
| Remove the steering arm from hub (item C) by undoing the nut on the track rod end and then using the ball joint splitter. If the split pin is rusted, just turn the nut off and it will act as a guillotine, then tap the pin out of the hole later with a drift. Alternatively if the track rod end is to be scrapped, loosen the locknut (item D) and wind the steeting arm out of the track rod end using moles on the steering arm. | |
| Undo the 2 nuts and 1 bolt attaching the bottom ball joint to the bottom arm (items E). If the lower ball joint (pic 2 item F) is to be re-used, it can be removed once the hub is off using the ball joint splitter. | |
| If you have ABS, try to remove the sensor from the hub. Alternatively, disconnect at car end and remove with hub. | |
| Finally, remove the hub to strut bolts (items B) and pull the hub out from the top and up from the bottom ball joint. There will be some spring action upwards from the bottom, especially if the other front wheel is on the ground.
Make sure you push the driveshaft through the centre as you go - it gets messy if you pull the driveshaft out at the gearbox end. A note of caution - NEVER insert a finger (or any part of the human body) into a hole such as B above in order to line up the parts. The spring tension could easily turn it into a guilotine. (I have heard of this happening). Always use a screwdriver or extension bar for doing such things. |
Reassembley
Refitting is the reverse of removal pretty much, with the following hints / tips.
Ensure the end of the driveshaft and wheelbearing parts in hub are clean before re-inserting, also if you have ABS wipe off the sensor face as these collect metal filings. Same goes for nuts & bolts, avoid dropping in the dirt and give everything a good wipe to remove dust before it goes back on.
You will find it easier to fit the hub back to the strut first so you're not fighting spring pressure while lining up the holes, then use a lever to pull down the bottom arm to fit into bottom ball joint.
If new ball joint / track rod end comes with a nylok nut, you will find you get it halfway on and the joint starts turning and you have trouble getting it on or off. Use the old castle nut (assuming the thread is the same) and do up tightly, then remove and fit the nylok.
Get everything put together loosely, then tighten ALL nuts & bolts once the hub is held firmly and not flopping about.
Once evrything is back together, go through the all the item letters in the pictures in turn and double check every item is tight. I can't stress enough than any of these bolts coming loose and falling out is very likely to cause total loss of steering control with the wheel turning suddenly & violently to one side.
After a couple of weeks or so, go round and check all bolts are tight again.
When refitting the brake disk ensure that the surface which mounts against the hub is completely clean and free of corrosion. Also ensure that the hub flange is completely clean and free of corrosion
Other Hints And Tips
If you decide to replace the tie rod ends it is essential to take care during disassembley
When you are removing the old end make sure you count the number of turns required to remove the old item from the steering arm
When you come to refit the new one make sure you wind it back on the exact same number of turns
What Else could I do at the same time
Obvoiusly as each part comes off check it for problems
Change Brake pads (Note you must do both sides at the same time)
Check Brake Caliper operation and dust seals
Check Brake Disk condition
Check Suspension struts for issues - dampers leaking, cracked springs etc
Paint brake Calipers
If you have removed (or replaced) the steering tie rods from the steering arms you should get a geometry check


